FIAT / DUCATO 244eLearn workshop manual · English · Offline edition
Procedures

1020D13 FRONT CRANKSHAFT OIL SEAL COVER- R+R AND REPLACE GASKETS FOR VERSIONS WITH AIR CONDITIONER

Engines: 2.0 16V, 2.8 JTD 8V
Engines: 2.0 16V

RemovingManual illustration 20

RefittingManual illustration 21
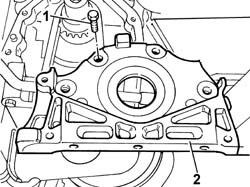
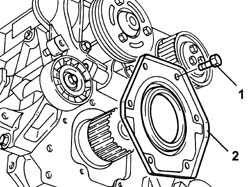
Op. 7055B54 UNDER-ENGINE GUARD - R R Op. 1092C11 POWER STEERING PUMP DRIVE BELT - R R FOR VERSIONS WITH AIR CONDITIONER Op. 1092B40 AIR CONDITIONER COMPRESSOR/ALTERNATOR DRIVE BELT - R + R See in Op. 1092A12 See in Op. 1032D12 See in Op. 1032B14 See in Op. 1032B44 See in Op. 1032B47 Op. 1024B54 ENGINE FLYWHEEL PROTECTION R R Op. 1020A26 CRANKCASE SUMP - R R CLEAN MATING SURFACES AND APPLY SEALANT FOR VEHICLE WITH AIR CONDITIONER See in Op. 1092G15 Op. 5530A14 ALTERNATOR - R+R FOR VERSIONS WITH AIR CONDITIONER Op. 5530A40 ALTERNATOR BRACKETS/MOUNT/SPACER - R R1. Undo the bolts securing the front crankshaft oil seal cover.2. Remove the front crankshaft oil seal cover from its seat.
Manual illustration 244002264
Engines: 2.0 16V

RefittingManual illustration 21

RemovingManual illustration 20
- Remove the oil sealing ring from its seat on the front cover.- Apply sealant to the front cover.
Manual illustration 244000495DescriptionQty.ComponentTypeClassification
.DOW CORNING 7091-FRONT COVER CRANKSHAFTSilicone sealant-
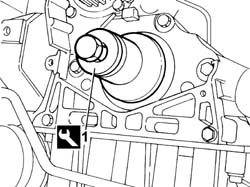
- Fit the cover and tighten the bolts to the recommended torque.1. Fit the seal using the tool.
Manual illustration 244000499DescriptionCodeFunction
.Fitting tool1.860.855.000Fitting crankshaft front oil seal
Manual illustration 244002265
Engines: 2.0 16V
Op. 5530A40 ALTERNATOR BRACKETS/MOUNT/SPACER - R R Op. 5530A14 ALTERNATOR - R+R FOR VERSIONS WITH AIR CONDITIONER See in Op. 1092G15 Op. 1020A26 CRANKCASE SUMP - R R CLEAN MATING SURFACES AND APPLY SEALANT FOR VEHICLE WITH AIR CONDITIONER Op. 1024B54 ENGINE FLYWHEEL PROTECTION R R See in Op. 1032B47 See in Op. 1032B44 See in Op. 1032B14 See in Op. 1032D12 See in Op. 1092A12 Op. 1092B40 AIR CONDITIONER COMPRESSOR/ALTERNATOR DRIVE BELT - R + R Op. 1092C11 POWER STEERING PUMP DRIVE BELT - R R FOR VERSIONS WITH AIR CONDITIONER Op. 7055B54 UNDER-ENGINE GUARD - R R
Engines: 2.0 16V, 2.0 JTD 8V, 2.3 JTD 16V, 2.8 JTD 8V

RemovingManual illustration 20

RefittingManual illustration 21
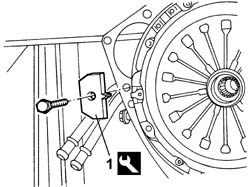
1. Fit the tool.
Manual illustration 244000499DescriptionCodeFunction
1Counter-torque1.860.741.000Tool for preventing crankshaft rotation
Manual illustration 244002266
Engines: 2.0 16V, 2.0 JTD 8V, 2.3 JTD 16V, 2.8 JTD 8V
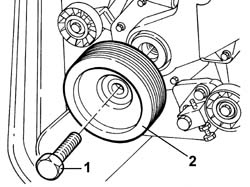
1. Undo the centre fixing bolt.2. Remove the engine components drive pulley.- Remove the tool.
Manual illustration 244000499DescriptionCodeFunction
.Counter-torque1.860.741.000Tool for preventing crankshaft rotation
Manual illustration 244002267
Engines: 2.0 16V, 2.0 JTD 8V, 2.3 JTD 16V, 2.8 JTD 8V
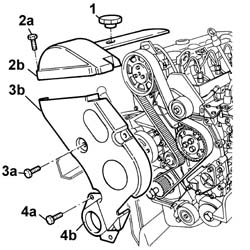
1. Remove the lubricant filler cap.2. Undo the bolts (2a) and remove the upper timing drive belt cover (2b).3. Undo the bolts (3a) and remove the intermediate timing drive belt cover (3b).4. Undo the bolts (4a) and remove the lower timing drive belt cover (4b).
Manual illustration 244002268
Engines: 2.0 16V, 2.0 JTD 8V, 2.3 JTD 16V, 2.8 JTD 8V
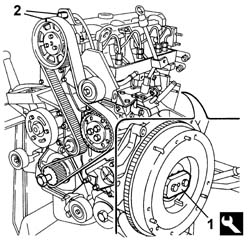
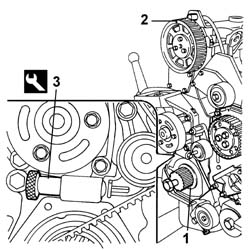
1. Fit the tool.
Manual illustration 244000499DescriptionCodeFunction
1Flange1.860.815.000Crankshaft rotation
2. Rotate the crankshaft until the camshaft references are alinged (cylinder no. 1 at T.D.C.).
Manual illustration 244002269
Engines: 2.0 16V, 2.0 JTD 8V, 2.3 JTD 16V, 2.8 JTD 8V
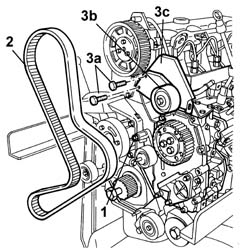
1. Loosen the bolt fixing the belt tensioner.2. Remove the timing belt.3. Undo the fixing bolts (3a) and remove the fixed pulley (3b) and the guard (3c) underneath.
Manual illustration 244002270
Engines: 2.0 16V, 2.0 JTD 8V, 2.3 JTD 16V, 2.8 JTD 8V
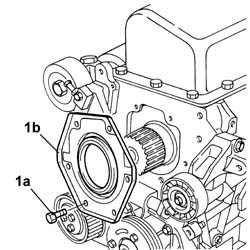
- Rotate the engine through 180° on the overhaul stand.1. Undo the bolts (1°) and remove the crankcase front cover (1b) with the oil seal incorporated.
Manual illustration 244002271
Engines: 2.0 16V, 2.0 JTD 8V, 2.3 JTD 16V, 2.8 JTD 8V

RefittingManual illustration 21

RemovingManual illustration 20
- Fit the crankcase front cover with the oil seal incorporated and tighten the fixing bolts to the recommended torque.
Manual illustration 244000559Value - daNmFasteningComponentØ  
.(engine crankcase side) 2.3BoltFRONT COVER CRANKSHAFTM8
- Rotate the engine through 180° on the overhaul stand.1. Check that the reference on the timing gear is in a vertical position.2. Check that the camshaft references are aligned.3. Fit the tool.
Manual illustration 244000499DescriptionCodeFunction
3Calibrated shim1.860.638.000Timing belt tensioning
Manual illustration 244002272
Engines: 2.0 16V, 2.0 JTD 8V, 2.3 JTD 16V, 2.8 JTD 8V
1. Fully fit the toothed timing drive belt.- Remove the tool.
Manual illustration 244000499DescriptionCodeFunction
.Calibrated shim1.860.638.000Timing belt tensioning
- Rotate the crankshaft through two revolutions.- Check once again that the timing references on the crankshaft and the camshaft are aligned.2. Tighten the belt tensioner nut to the recommended torque.
Manual illustration 244000559Value - daNmFasteningComponentØ  
.(cylinder head side) 2.5NutMOBILE TIMING TENSIONERM8
Manual illustration 244006324
Engines: 2.0 16V, 2.0 JTD 8V, 2.3 JTD 16V, 2.8 JTD 8V
- Remove the tool.
Manual illustration 244000499DescriptionCodeFunction
.Flange1.860.815.000Crankshaft rotation
- Fit the timing belt covers and secure them using the bolts.- Fit the oil filler plug.- Fit the tool.
Manual illustration 244000499DescriptionCodeFunction
.Counter-torque1.860.741.000Tool for preventing crankshaft rotation
- Fit the crankshaft pulley and tighten the bolt to the recommended torque.
Manual illustration 244000559Value - daNmFasteningComponentØ  
.(crankshaft side) 20BoltCRANKSHAFT PULLEYM20
- Remove the tool.
Manual illustration 244000499DescriptionCodeFunction
.Counter-torque1.860.741.000Tool for preventing crankshaft rotation
Engines: 2.8 JTD 8V

RemovingManual illustration 20

RefittingManual illustration 21
Op. 7055B54 UNDER-ENGINE GUARD - R R See in Op. 1008B10 See in Op. 1032D12 See in Op. 1032B141. Undo the fixing bolts.2. Remove the front crankshaft oil seal cover.
Manual illustration 244002273
Engines: 2.8 JTD 8V

RefittingManual illustration 21

RemovingManual illustration 20
- Fit the crankshaft front cover with the oil seal incorporated.- Tighten to torque.
Manual illustration 244000559Value - daNmFasteningComponentØ  
.(engine crankcase side) 2.3BoltFRONT COVER CRANKSHAFTM8
See in Op. 1032B14 See in Op. 1032D12 See in Op. 1008B10 Op. 7055B54 UNDER-ENGINE GUARD - R R