Procedures
1076B50 EXHAUST PIPE ATTACHMENT TO ENGINE - R + R
Engines: 2.0 16V
Removing
- Disconnect the negative battery terminal. Op. 7055B54 UNDER-ENGINE GUARD - R R1. Disconnect the electrical connection for the Lambda sensor (1a), undo the Lambda sensor (1b) and remove it.2. Undo the bolts fixing the front exhaust silencer (2a) and move the front exhaust silencer (2b) aside.3. Undo the bolt fixing the exhaust pipe to the bracket (3a), loosen the bolt securing the bracket to the gearbox (3b) and move the bracket (3c) aside.4. Undo the exhaust manifold (4a) fixing nuts and remove the exhaust pipe (4b).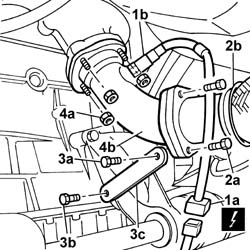
Engines: 2.0 16V
Refitting
- Fit the exhaust pipe.- Tighten the exhaust manifold fixing nuts to torque.- Position the bracket.- Tighten the bolt fixing the bracket to the gearbox.- Tighten the bolt fixing the exhaust pipe to the bracket to torque.- Position the front exhaust silencer.- Tighten the bolts fixing the front exhaust silencer to torque.- Fit the Lambda sensor.- Tighten the Lambda sensor to torque. | Value - daNm | Fastening | Component | Ø |
|---|---|---|---|---|
| . | (Lambda sensor) 3.8 - 5.8 | Bolt | EXHAUST PIPE TO ENGINE | M18 X 1,5 |
Engines: 2.3 JTD 16V
Removing
- Position the vehicle on a lift.- Raise the lift.1. Undo the fixing nuts (1a) and separate the exhaust pipe from the flange (1b) for the turbocharger hose.2. Undo the bolts fixing the rear flange (2a) and remove the exhaust pipe attachment to the engine (2b).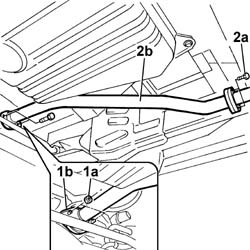
Engines: 2.3 JTD 16V
Refitting
- Fit the exhaust pipe attachment to the engine.- Tighten the bolts fixing the flange to the rear exhaust silencer. | Value - daNm | Fastening | Component | Ø |
|---|---|---|---|---|
| . | 2.6 | Bolt | REAR SILENCER EXHAUST | M8 |
| Value - daNm | Fastening | Component | Ø |
|---|---|---|---|---|
| . | 2.6 | Nuts | EXHAUST PIPE TO ENGINE | M8 |
Engines: 2.8 JTD 8V
- Operation not available.
Engines: 2.0 JTD 8V
Removing
- Position the vehicle on a lift.- Raise the lift.1. Undo the fixing nuts (1a) and separate the exhaust pipe from the flange (1b) for the turbocharger hose.2. . Undo the bolts fixing the rear flange (2a) and remove the exhaust pipe attachment to the engine (2b).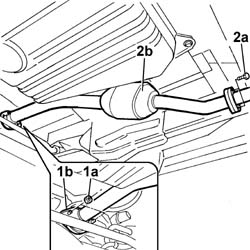
Engines: 2.0 JTD 8V
Refitting
- Fit the exhaust pipe attachment to the engine.- Tighten the bolts fixing the flange to the rear exhaust silencer. | Value - daNm | Fastening | Component | Ø |
|---|---|---|---|---|
| . | 2,6 | Bolts | REAR SILENCER EXHAUST | M8 |
| Value - daNm | Fastening | Component | Ø |
|---|---|---|---|---|
| . | 2.6 | Nuts | EXHAUST PIPE TO ENGINE | M8 |