FIAT / DUCATO 244eLearn workshop manual · English · Offline edition
Procedures

3340A80 ABS SYSTEM WIRING BUNDLE - R R OR REPLACE

Engines: 2.0 16V, 2.0 JTD 8V, 2.3 JTD 16V, 2.8 JTD 8V

RemovingManual illustration 20

RefittingManual illustration 21
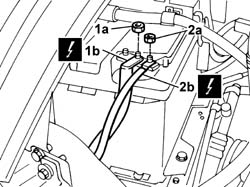
- Position the vehicle on the lift.1. Undo the nut (1a) and disconnect the battery negative terminal (1b).
Manual illustration 244000463DescriptionConnector
1bBatteryA001B
2. Undo the nut (2a) and disconnect the earth lead (2b) from the ABS wiring loom.
Manual illustration 244000463DescriptionConnector
2bBattery earthC001
- Release the ABS front earth lead from the retaining bands on the battery cradle.
Manual illustration 244003910
Engines: 2.0 16V, 2.0 JTD 8V, 2.3 JTD 16V, 2.8 JTD 8V
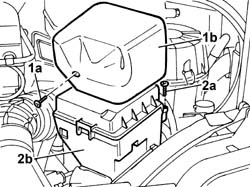
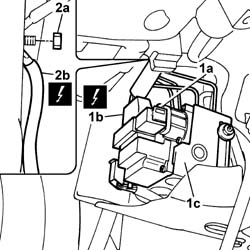
1. Open stud (1a) on the junction unit protective gaiter (1b) and remove from the engine bay.2. Undo bolt (2a) and remove protective cover (2b) from the engine bay junction unit.
Manual illustration 244003911
Engines: 2.0 16V, 2.0 JTD 8V, 2.3 JTD 16V, 2.8 JTD 8V
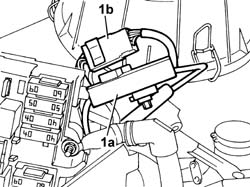
- Release the control unit from the retaining clips on the mount.1. Disconnect electrical connection (1a) and electrical connection (1b) to the ABS.
Manual illustration 244000463DescriptionConnector
1aFront/ABS couplingD186A
Manual illustration 244000463DescriptionConnector
1bFront/ABS couplingD186B
Manual illustration 244003912
Engines: 2.0 16V, 2.0 JTD 8V, 2.3 JTD 16V, 2.8 JTD 8V
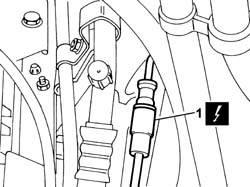
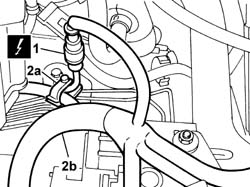
1. Disconnect the right front wheel phonic wheel sensor electrical connection.
Manual illustration 244000463DescriptionConnector
1Right front wheel sensor for ABSK071
- To facilitate subsequent operations to remove the ABS wiring loom, tie the ABS front earth wire to the right front phonic wheel sensor electrical connection wire using a cord.- Repeat the operation for the ABS electrical supply connection wires.
Manual illustration 244003913
Engines: 2.0 16V, 2.0 JTD 8V, 2.3 JTD 16V, 2.8 JTD 8V
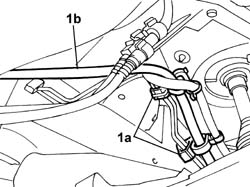
- Raise the lift. Op. 7055B54 UNDER-ENGINE GUARD - R R1. Remove the ABS wiring loom (1a) by pulling cord (1b) positioned previously downward.2. Open the ABS wiring loom retaining clips.
Manual illustration 244003914
Engines: 2.0 16V, 2.0 JTD 8V, 2.3 JTD 16V, 2.8 JTD 8V
1. Open device (1a) for undoing the electrical connection, then disconnect electrical connection (1b) on ABS hydraulic control unit (1c).
Manual illustration 244000463DescriptionConnector
1bABS control unitM050
2. Undo the nut (2a) and disconnect ABS front earth lead (1b).
Manual illustration 244000463DescriptionConnector
2bABS front earthC012
Manual illustration 244003915
Engines: 2.0 16V, 2.0 JTD 8V, 2.3 JTD 16V, 2.8 JTD 8V
1. Disconnect the left front wheel phonic wheel sensor electrical connection.
Manual illustration 244000463DescriptionConnector
1Left front wheel sensor for ABSK070
2. Open retaining band (2a), then partly remove ABS wiring loom (2b) by pulling the cord positioned previously downward.
Manual illustration 244003916
Engines: 2.0 16V, 2.0 JTD 8V, 2.3 JTD 16V, 2.8 JTD 8V
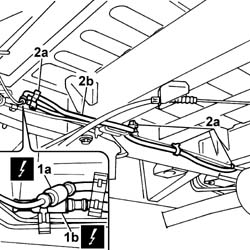
1. Disconnect electrical connection (1a) of the right rear phonic wheel and disconnect electrical connection (1b) of the left rear phonic wheel sensor.
Manual illustration 244000463DescriptionConnector
1aRight rear wheel sensor for ABSK076
Manual illustration 244000463DescriptionConnector
1bLeft rear wheel sensor for ABSK075
2. Open retaining bands (2a) positioned under the body and release the ABS wiring loom (2b).
Manual illustration 244003917
Engines: 2.0 16V, 2.0 JTD 8V, 2.3 JTD 16V, 2.8 JTD 8V
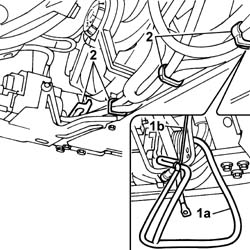
- Open retaining bands (1a) in the steering column area, then remove the ABS wiring loom (1b) from the vehicle.
Manual illustration 244003918
Engines: 2.0 16V, 2.0 JTD 8V, 2.3 JTD 16V, 2.8 JTD 8V

RefittingManual illustration 21

RemovingManual illustration 20
- Position a new ABS electrical wiring loom and secure to the body with retaining bands.- Connect the left rear wheel phonic wheel sensor electrical connection.
Manual illustration 244000463DescriptionConnector
.Left rear wheel sensor for ABSK075
- Connect the right rear wheel phonic wheel sensor electrical connection.
Manual illustration 244000463DescriptionConnector
.Right rear wheel sensor for ABSK076
- Connect the left front wheel phonic wheel sensor electrical connection.
Manual illustration 244000463DescriptionConnector
.Left front wheel sensor for ABSK070
- Tighten the ABS electrical wiring loom to the body.- Position the ABS front earth lead and tighten the retaining nut to the body.
Manual illustration 244000463DescriptionConnector
.ABS front earthC012
- Connect the electrical connection to the ABS control unit, then do up the safety device
Manual illustration 244000463DescriptionConnector
.ABS control unitM050
- To facilitate subsequent operations to refit the ABS wiring loom, tie up the ABS electrical connection wires using a cord.- Repeat the operation by tying the ABS front earth wire to the right front phonic wheel sensor electrical connection.- Position the ABS wiring loom on the front beam, then do up the retaining bands. Op. 7055B54 UNDER-ENGINE GUARD - R R- Lower the lift.- Pull up the ABS electrical connection wires, then connect to the junction unit.
Manual illustration 244000463DescriptionConnector
.Front/ABS couplingD186A
Manual illustration 244000463DescriptionConnector
.Front/ABS couplingD186B
- Refit the junction unit to the mount.- Close the protective cover and tighten the fixing bolt.- Position the junction unit protective gaiter and close.- Pull up the battery earth lead and right front phonic wheel sensor lead.- Connect the right front wheel phonic wheel sensor electrical connection.
Manual illustration 244000463DescriptionConnector
.Right front wheel sensor for ABSK071
- Position the ABS wiring loom earth lead to the battery negative terminal, then tighten the nut.
Manual illustration 244000463DescriptionConnector
.Battery earthC001
- Connect the negative battery terminal.
Manual illustration 244000463DescriptionConnector
.BatteryA001B
- Remove the vehicle from the lift.