FIAT / DUCATO 244eLearn workshop manual · English · Offline edition
Procedures

1016A20 SINGLE CAM COVER - R + R AND REPLACE GASKET

Engines: 2.0 16V, 2.0 JTD 8V, 2.3 JTD 16V, 2.8 JTD 8V
Engines: 2.0 16V

RemovingManual illustration 20

RefittingManual illustration 21
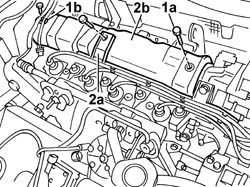
Op. 1048A31 RIGID PIPE CONNECTING AIR CLEANER TO INLET MANIFOLD RIGID PIPE R R1. Undo the bolts and the nut (1a) fixing the tappet cover and move the electrical wiring (1b) aside.2. Move the spark plug lead duct (2a) aside and remove the tappet cover (2b).
Manual illustration 244001090
Engines: 2.0 16V

RefittingManual illustration 21

RemovingManual illustration 20
- Fit a new gasket in place.- Fit the tappet cover in place and tighten the fixing bolts and nut, checking the torque.- Place the spark plug lead duct in position. Op. 1048A31 RIGID PIPE CONNECTING AIR CLEANER TO INLET MANIFOLD RIGID PIPE R R
Engines: 2.3 JTD 16V

RemovingManual illustration 20

RefittingManual illustration 21
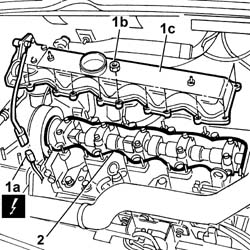
- Disconnect the negative battery terminal. See in Op. 1016A101. Disconnect the electrical connector for the timing sensor (1a) and undo the nut fixing the tappet cover to the cylinder head (1b) and remove the cover (1c).
Manual illustration 244000463DescriptionConnector
1aTiming sensorK047
2. Remove the tappet cover gasket.
Manual illustration 244001091
Engines: 2.3 JTD 16V

RefittingManual illustration 21

RemovingManual illustration 20
- Replace the tappet cover gasket.- Fit the tappet cover in position.- Tighten the nuts to torque.
Manual illustration 244000559Value - daNmFasteningComponentØ  
.1,0NutCAM COVER-
- Connect the electrical connection for the timing sensor.
Manual illustration 244000463DescriptionConnector
1aTiming sensorK047
See in Op. 1016A10 Op. 0010T11 ENGINE OIL CHECK LEVEL AND TOP UP- Connect the negative battery terminal.
Engines: 2.0 JTD 8V

RemovingManual illustration 20

RefittingManual illustration 21
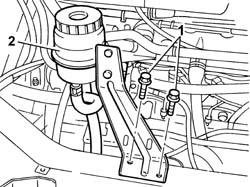
See in Op. 1048A21 Op. 1048B16 PIPES AND/OR ELBOW BETWEEN TURBOCHARGER AND THROTTLE CASING - R.R. See in Op. 1080C171. Undo the bolts securing the power steering fluid reservoir to the mounting bracket.2. Move the power assisted steering fluid reservoir away from the work area.
Manual illustration 244001092
Engines: 2.0 JTD 8V
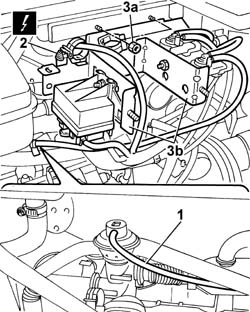
1. Disconnect the vacuum pipe from the EGR valve.2. Disconnect the electrical connection for the heater plugs control unit.
Manual illustration 244000463DescriptionConnector
2Heater plugs control unitM015C
3. Undo the fixing nuts (3a) and move the mounting bracket (3b) complete with heater plugs control unit aside.
Manual illustration 244001093
Engines: 2.0 JTD 8V
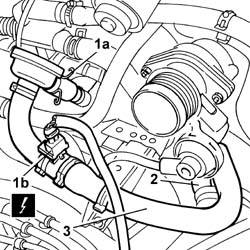
1. Press the retaining spring (1a) and disconnect the electrical connection (1b) for the engine oil vapour heating resistance.
Manual illustration 244000463DescriptionConnector
1bOil vapour heating resistanceO007A
2. Disconnect the engine oil vapour pipe from the air intake pipe between the filter and the turbocharger.3. Remove the oil vapour pipe.
Manual illustration 244001094
Engines: 2.0 JTD 8V
- Disconnect the electrical connection for the timing sensor.
Manual illustration 244000463DescriptionConnector
.Timing sensorK047
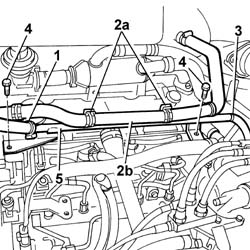
1. Disconnect the recirculation pipe for the engine coolant reservoir.2. Open the bands (2a) and release the heater water pipe (2b).3. Disconnect the flexible recirculation pipe to the thermostat.4. Undo the fixing bolts.5. Remove the rigid water recirculation pipe.
Manual illustration 244001095
Engines: 2.0 JTD 8V
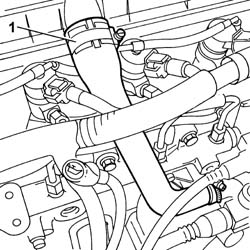
1. Disconnect the separator engine oil vapour pipe.
Manual illustration 244001096
Engines: 2.0 JTD 8V
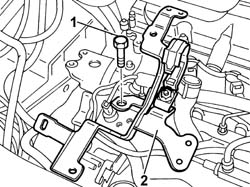
1. Undo the fixing bolts.2. Remove the bracket on the pressure pump mounting.
Manual illustration 244001097
Engines: 2.0 JTD 8V
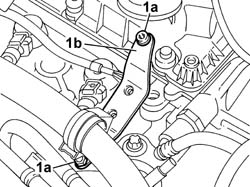
1. Undo the bolts (1a) and move the bracket (1b) from the housing.
Manual illustration 244001098
Engines: 2.0 JTD 8V
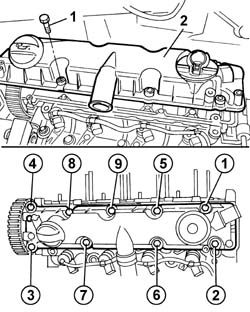
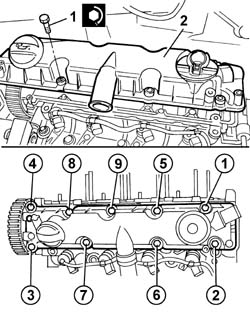
1. Undo the fixing bolts in the order given below.2. Remove the tappet cover.- Remove the perimeter seal from the tappet cover.
Manual illustration 244001099
Engines: 2.0 JTD 8V

RefittingManual illustration 21

RemovingManual illustration 20
- Fit the new perimeter seal on the tappet cover.- Fit the tappet cover in its housing on the cylinder head.1. Tighten the bolts fixing the tappet cover to torque in the order given below.
Manual illustration 244000559Value - daNmFasteningComponentØ  
.1,0BoltCAM COVERM6
Manual illustration 244001100
Engines: 2.0 JTD 8V
- Tighten the bolts fixing the thermostat side bracket.- Fit the bracket on the pressure pump mounting and tighten the fixing bolts.- Connect the separator engine oil vapour pipe.- Fit the rigid water recirculation pipe and tighten the fixing bolts.- Connect the flexible recirculation pipe to the thermostat.- Secure the heater water pipe to the bands on the rigid pipe.- Connect the recirculation pipe for the engine coolant reservoir.- Connect the electrical connection for the timing sensor.
Manual illustration 244000463DescriptionConnector
.Timing sensorK047
- Fit the oil vapour pipe.- Connect the engine oil vapour pipe to the air intake pipe between the filter and the turbocharger.- Connect the electrical connection for the engine oil vapour heating resistance.
Manual illustration 244000463DescriptionConnector
.Oil vapour heating resistanceO007A
- Fit the bracket, complete with solenoid valves and heater plugs control unit, and tighten the nuts fixing them to the bodyshell.- Connect the electrical connection for the heater plugs control unit.
Manual illustration 244000463DescriptionConnector
.Heater plugs control unitM015C
- Cconnect the vacuum pipe from the EGR valve.- Fit the power assisted steering fluid reservoir and tighten the bolts fixing it to the crossmember. See in Op. 1080C17 Op. 1048B16 PIPES AND/OR ELBOW BETWEEN TURBOCHARGER AND THROTTLE CASING - R.R. See in Op. 1048A21
Engines: 2.8 JTD 8V

RemovingManual illustration 20

RefittingManual illustration 21
- Disconnect the negative battery terminal. See in Op. 1016A101. Disconnect the electrical connector for the timing sensor (1a) and undo the nut fixing the tappet cover to the cylinder head (1b) and remove the cover (1c).
Manual illustration 244000463DescriptionConnector
1aTiming sensorK047
2. Remove the tappet cover gasket.
Manual illustration 244001091
Engines: 2.8 JTD 8V

RefittingManual illustration 21

RemovingManual illustration 20
- Replace the tappet cover gasket.- Fit the tappet cover in position.- Tighten the nuts to torque.
Manual illustration 244000559Value - daNmFasteningComponentØ  
.1,0NutCAM COVER-
- Connect the electrical connection for the timing sensor.
Manual illustration 244000463DescriptionConnector
1aTiming sensorK047
See in Op. 1016A10 Op. 0010T11 ENGINE OIL CHECK LEVEL AND TOP UP- Connect the negative battery terminal.