FIAT / DUCATO 244eLearn workshop manual · English · Offline edition
Procedures

1028H10 PISTON WITH CONNECTING ROD - R R

Engines: 2.0 JTD 8V, 2.3 JTD 16V
Engines: 2.0 16V, 2.0 JTD 8V, 2.3 JTD 16V, 2.8 JTD 8V

RemovingManual illustration 20

RefittingManual illustration 21
Op. 7055B54 UNDER-ENGINE GUARD - R R Op. 4450B04 RIGHT FRONT WHEEL R R Op. 1092B72 POWER STEERING PUMP DRIVE BELT - ALTERNATOR - R&R See in Op. 1092A10 See in Op. 1032D12 Op. 1016B10 SINGLE CYLINDER HEAD EXTENSION - CHANGE GASKET See in Op. 1016C10- Fit the timing side flexible engine block by screwing in the retaining bolts without tightening.- Remote the tool positioned beneath the sump for supporting the power unit.
Manual illustration 244000499DescriptionCodeFunction
.Crossmember1.870.735.000Lower engine mounting beam
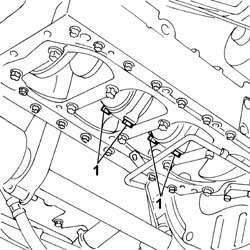
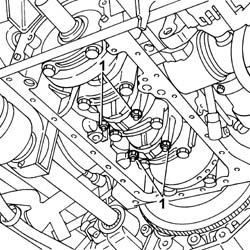
Op. 1020A10 CRANKCASE SUMP - R&R AND REPLACE GASKET See in Op. 1084B281. Undo the bolts and remove the connecting rod caps complete with 2nd and 3rd cylinder lower connecting rod half-bearings.
Manual illustration 244002367
Engines: 2.0 16V, 2.0 JTD 8V, 2.3 JTD 16V, 2.8 JTD 8V
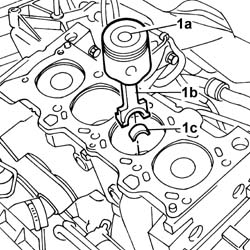
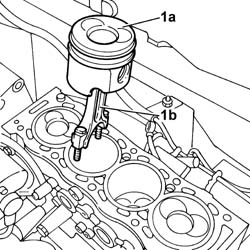
- Lower the vehicle.1. Withdraw and remove 2nd and 3rd cylinder pistons (1a) with connecting rods (1b) and upper connecting rod half bearings.
Manual illustration 244002368
Engines: 2.0 16V, 2.0 JTD 8V, 2.3 JTD 16V, 2.8 JTD 8V
- Turn the crankshaft and proceed in the same way to remove the 1st and 4th cylinder pistons and connecting rods.
Engines: 2.0 16V, 2.0 JTD 8V, 2.3 JTD 16V, 2.8 JTD 8V

RefittingManual illustration 21

RemovingManual illustration 20
- Fit the 1st and 4th pistons with connecting rods and connecting rod upper bearing halves using a suitable installing tool to compress the piston rings.- Fit the connecting rod caps complete with 1st and 4th cylinder lower bearing halves and secure by tightening the bolts to the recommended torque. Carry out angular tightening separately and using an angle wrench for tightening.
Manual illustration 244000499DescriptionCodeFunction
.Torque wrench1.860.942.000Connecting rod cap bolt angular tightening
Manual illustration 244000559Value - daNmFasteningComponentØ  
.4+60°BoltCONNECTING ROD CAPS-
- Proceed in the same way to fit the 2nd and 3rd cylinder pistons and connecting rods. See in Op. 1084B28 Op. 1020A10 CRANKCASE SUMP - R&R AND REPLACE GASKET- Remove the tool positioned beneath the sump for supporting the power unit.
Manual illustration 244000499DescriptionCodeFunction
.Crossmember1.870.735.000Lower engine mounting beam
- Undo the retaining bolts and remove the timing side flexible engine block. See in Op. 1016C10 Op. 1016B10 SINGLE CYLINDER HEAD EXTENSION - CHANGE GASKET See in Op. 1032D12 See in Op. 1092A10 Op. 1092B72 POWER STEERING PUMP DRIVE BELT - ALTERNATOR - R&R Op. 4450B04 RIGHT FRONT WHEEL R R Op. 0010T20 COOLANT CHECK DENSITY AND TOP UP IF NECESSARY Op. 0010T21 COOLANT CHECK DENSITY AND TOP UP IF NECESSARY Op. 0010T11 ENGINE OIL CHECK LEVEL AND TOP UP Op. 7055B54 UNDER-ENGINE GUARD - R R
Engines: 2.0 JTD 8V

RemovingManual illustration 20

RefittingManual illustration 21
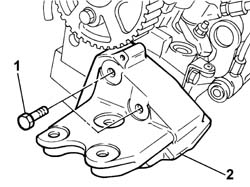
Op. 7055B54 UNDER-ENGINE GUARD - R R Op. 4130B10 POWER STEERING FLUID RESEVOIR R R See in Op. 1048A21 See in Op. 1076B50 Op. 1092G10 SINGLE ENGINE BELT R R Op. 1092G10 SINGLE ENGINE BELT R R See in Op. 1016C101. Remove the timing side rigid engine mount from the cylinder head.
Manual illustration 244002369
Engines: 2.0 JTD 8V
- Fit the rigid support on the crankcase.- Fit the timing side flexible engine block by screwing in the retaining bolts without tightening.- Remote the tool positioned beneath the sump for supporting the power unit.
Manual illustration 244000499DescriptionCodeFunction
.Crossmember1.870.735.000Lower engine mounting beam
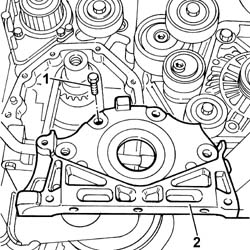
Op. 1020A20 CRANK CASE OIL SUMP - R + R CLEAN SEALS FOR SEALANT APPLICATION See in Op. 1032B441. Undo the bolts securing the front crankshaft oil seal cover.2. Remove the front crankshaft oil seal cover from its seat.
Manual illustration 244002370
Engines: 2.0 JTD 8V
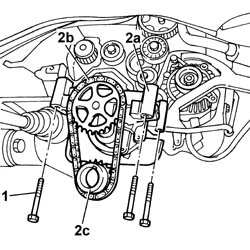
1. Undo the fixing bolts.2. Remove the oil pump (2a) complete with drive chain (2b), pinion (2c) and tab.
Manual illustration 244002371
Engines: 2.0 JTD 8V
1. Undo the bolts and remove the connecting rod caps complete with 2nd and 3rd cylinder lower connecting rod half-bearings.
Manual illustration 244002372
Engines: 2.0 JTD 8V
- Lower the vehicle.1. Withdraw and remove 2nd and 3rd cylinder pistons (1a) with connecting rods (1b) and upper connecting rod half bearings.
Manual illustration 244002373
Engines: 2.0 JTD 8V
- Turn the crankshaft and proceed in the same way to remove the 1st and 4th cylinder pistons and connecting rods.
Engines: 2.0 JTD 8V

RefittingManual illustration 21

RemovingManual illustration 20
- Fit the 1st and 4th pistons with connecting rods and connecting rod upper bearing halves using a suitable installing tool to compress the piston rings.
Manual illustration 244000499DescriptionCodeFunction
.Band1.860.700.000Fitting pistons
- Fit the connecting rod caps complete with 1st and 4th cylinder lower bearing halves and secure by tightening the bolts to the recommended torque. Carry out angular tightening separately and using an angle wrench for tightening.
Manual illustration 244000499DescriptionCodeFunction
.Torque wrench1.860.942.000Connecting rod cap bolt angular tightening
Manual illustration 244000559Value - daNmFasteningComponentØ  
.2.1+74°BoltCONNECTING ROD CAPS-
- Proceed in the same way to fit the 2nd and 3rd cylinder pistons and connecting rods.- Fit the engine oil pump tightening the bolts to the recommended torque.
Manual illustration 244000559Value - daNmFasteningComponentØ  
.1BoltENGINE OIL PUMP-
- Fit the chain, the pinion and the pinion fastening tabs.- Remove the oil sealing ring from its seat on the front cover.- Apply sealant to the front cover plane.
Manual illustration 244000495DescriptionQty.ComponentTypeClassification
.DOW CORNING 7091-FRONT COVER CRANKSHAFTSilicone sealant-
- Fit the cover and tighten the fixing bolts to the recommended torque.
Manual illustration 244000559Value - daNmFasteningComponentØ  
.1,5BoltFRONT COVER CRANKSHAFT-
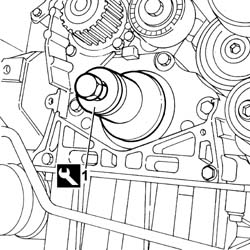
See in Op. 1032B44 Op. 1020A20 CRANK CASE OIL SUMP - R + R CLEAN SEALS FOR SEALANT APPLICATION1. Fit the seal (1a) using the tool (1b).
Manual illustration 244000499DescriptionCodeFunction
1bFitting tool1.860.855.000Fitting crankshaft front oil seal
Manual illustration 244002374
Engines: 2.0 JTD 8V
- Fit the tool positioned underneath the sump for supporting the power unit.
Manual illustration 244000499DescriptionCodeFunction
.Crossmember1.870.735.000Lower engine mounting beam
- Remove the timing side rigid engine mount.- Remove the rigid support on the crankcase.- Fit the timing side rigid engine support on the cylinder head tightening the fixing bolts. See in Op. 1016C10 Op. 1092G10 SINGLE ENGINE BELT R R See in Op. 1076B50 See in Op. 1048A21 Op. 4130B10 POWER STEERING FLUID RESEVOIR R R Op. 0010T20 COOLANT CHECK DENSITY AND TOP UP IF NECESSARY Op. 0010T10 ENGINE OIL CHECK LEVEL AND TOP UP